
8 Yoga Poses for Psoas Pain Relief
Possibly the most integral muscle group in your entire body, the psoas governs the central functioning of your core. Without it, you wouldn’t be able to move properly, walk, stand, or do much of anything, because the muscles in this group also attach your legs to your spine.
Issues with your psoas can be deeply painful, and it’s a difficult area to massage. The psoas major, psoas minor, and iliacus combined make up your iliopsoas, commonly referred as simply the psoas. And when the psoas is unhappy, it can cause symptoms with a range of severity, from slightly uncomfortable to totally debilitating, like difficulty walking or standing upright, lower back pain, and pelvic pain.
Athletic injuries, prolonged periods of sitting and surgery can affect the health of your psoas, and if you’re experiencing a tight and shortened psoas, it’s likely you’re also suffering from weakness and pain. You can relieve your symptoms and fully recover from psoas issues by stretching and strengthening this important muscle group with yoga.
How to Relieve Psoas Pain
Psoas pain can affect the entire structure of your body, causing adjoining muscles to become overworked and your posture to become off-kilter, leading to widespread chronic pain. Yoga can help correct issues with your psoas and get you back to feeling balanced again. By practicing a few specific yoga poses, you can directly stretch the psoas and surrounding areas, relieving tension, pain, and stiffness.
It’s important to also strengthen the psoas to enable your body to function properly. A weak psoas can put enormous strain on your surrounding muscles and joints, and a strong core is essential for your physical health. By lengthening and strengthening your psoas at the same time, you can correct issues and reduce pain.
If you’re suffering from a tight or weak psoas, try practicing the yoga poses below on a regular basis to start the healing process.
8 Yoga Poses for Psoas Pain Relief
1. Low Lunge Pose

Low Lunge is an easy pose to start lengthening your psoas muscles, and you can adjust this position to stretch as deeply as you feel comfortable.
From a kneeling position, start by bringing your left foot forward and bending your left leg at the knee. Inhale while reaching your arms over your head, keeping them parallel with the sides of your head. Allow your chest to expand and lengthen your spine. Remember to keep your chin level and your gaze focused straight ahead. Repeat on the other side.
2. Tree Pose

Tree pose strengthens and stretches your psoas muscles by isolating the area building strength through balance.
Stand in Mountain pose and place your feet hip distance apart, arms relaxed at your sides. Gently shift your body weight to your left foot and bending your right knee, lifting it upward. Place the sole of your right foot on the inside of your left thigh. Keep your spine and head straight, with your gaze facing forward. Give yourself a moment to steady your balance, bring your hands together in Namaste formation. Hold for 5-6 deep breaths.
3. Boat Pose

One of the best asanas for your core, Boat pose strengthens your abdominal muscles for better balance and posture.
Start by sitting with your legs stretched out in front of you and your arms at your sides. Lean back slightly so that your weight is evenly balanced. Inhale, engage your core, and exhale as you lift both your legs to a 45 degree angle, and extend your arms straight out alongside your legs. If this pose feels too difficult, try bending your knees and bringing your hands behind your knees for support. Keep your spine long and your core engaged as you hold this pose for 30-45 seconds.
4. Knee-To-Chest Pose

When your psoas is in pain and walking or standing upright feels difficult, Knee-To-Chest pose offers a supine stretch that can relieve your symptoms.
Lie down flat on your back with your arms at your sides. Inhale, and then as you exhale, bring your right knee to your chest. Thoughtfully extend and stretch your left leg until you feel the tension begin to release from your abs and inside your hip. As you hug your knee to your chest, remember to breathe and focus on allowing your core to fully relax. Hold for 30-60 seconds and repeat on the other side.
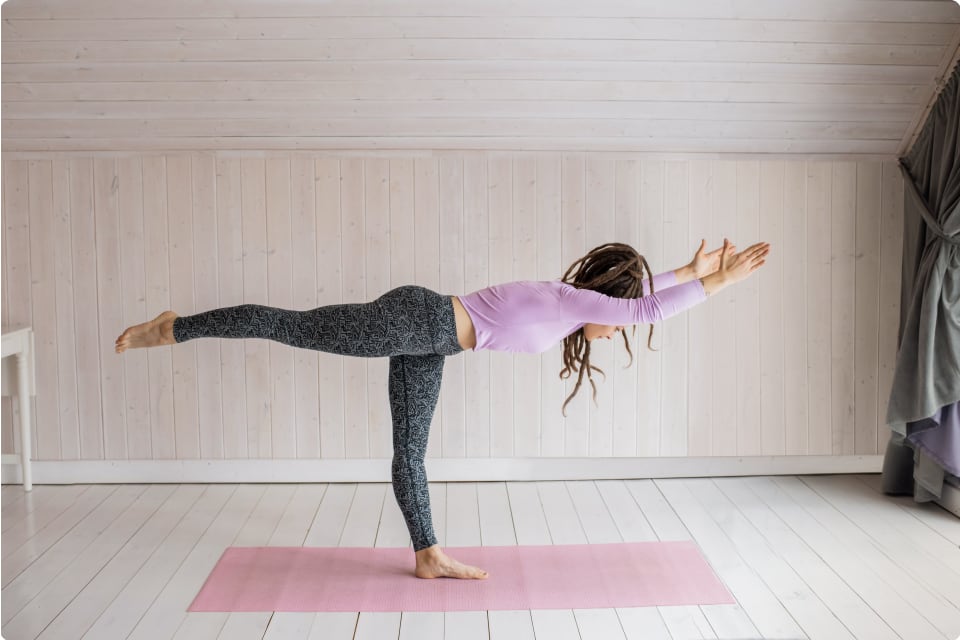
5. Dancer’s Pose

Like Tree pose, Dancer’s pose works to strengthen your psoas through balance, with a deep stretch that lengthens all of the muscles in the front side of your torso.
Stand in the middle of your mat with your weight evenly balanced on both feet. Transfer your weight onto your left foot while bending your right knee and grabbing your right foot with your right hand. Lift your left arm up toward the ceiling. Bend at your waist and slowly lean forward, lifting your right leg and engaging your core. You can deepen the stretch by creating some resistance — simply push outward with your right foot while pulling in with your right hand. For better balance, focus your gaze on a fixed point in front of you. Hold for 3-5 breaths, then repeat on the other side.
6. Supported Bridge Pose

Supported Bridge pose uses a yoga block to both support your weight and lengthen the muscles in your core and inside your hips.
Start by lying on your back with your knees bent and a yoga block placed nearby. On your next exhale, tuck your chin and lift your hips, being careful not to allow your knees to splay outward. Take your yoga block and place underneath your lower back, supporting your weight and providing a deep stretch to the frontside of your pelvis. Stay in the pose for 30-60 seconds.
7. Reclining Hero’s Pose

By modifying Hero’s pose to a reclining position, you can gently lengthen your psoas and stretch your quad muscles.
Kneel on your yoga mat and rest your buttocks on the backs of your heels. Sit with your spine straight and inhale, and as you exhale, begin to gently lower your torso to the floor. You can move slowly, lowering yourself onto your back one vertebrae at a time. Rest your hands on your chest or reach your arms above your head to increase the stretch. Once your are resting on your back, you can also bring your focus to your hips and allow them to rise slightly upward for a greater stretch in your psoas minor.
8. Cobra Pose

Cobra pose lengthens your abdominal muscles and releases tension in your lower back.
Lie on your stomach with your legs extended, arms folded under your head and your chin resting on your forearms. Place your hands at the level of your chest and press down with your hands. Slightly lift your head off the mat, keeping your head and back aligned, and press your thighs together. Now, steadily pull your elbows towards your ribs and align your hands and shoulders. On a deep inhale, press your hands into the mat, curl your shoulders backward, and lift your upper body off the mat. Make sure to gaze upward and press your hips into the mat to target your psoas. Hold this position for a few breaths and then rest.
Online Yoga Classes – Live & Interactive
Get 2 free private yoga sessions and 2 weeks of unlimited group classes with authentic yoga teachers. No credit card required when you sign up today!
Share this post?
Interesting Articles
Yoga for Sore Legs: 5 Simple Poses to Soothe and Energize!
You know the feeling, after a long bike ride, hike, or running a marathon — sore legs that seem like they can’t even move. Whether you’re a runner, cy...
Continue ReadingHow Yoga Can Help Overcoming Addiction and Bad Habits
Are you struggling with addiction or bad habits that are holding you back from living your best life? You're not alone. Many people find themselves tr...
Continue ReadingMyofascial Release Yoga: Improving the Connections Within Your Body
It’s easy to think that symptoms of soreness, stiffness, and lack of mobility in your body is simply an issue solely related to muscles. But there are...
Continue ReadingRecent Articles
Neck and Shoulder Yoga for Pain Relief : New 1-on-1 Series!
Announcing A New 1-on-1 Series! We’re offering a new series of 1-on-1 classes! Our Neck and Shoulder Yoga for Pain Relief is designed to hel...
Continue ReadingOur New And Improved Group Class Platform!
Here's a quick walkthrough of our new GC interfaceExciting news! Our platform got an upgrade!MyYogaTeacher is always evolvi...
Continue ReadingNew 1-on-1 Hip Opening Series: Unlock Freedom in Movement
The new transformative 1-on-1 Hip Opening Series, specially designed to release tension and boost strength and mobility in your hips, is the perfect w...
Continue Reading© Copyright 2020 MyYogaTeacher Inc