Trataka is a candle gazing meditation technique that uses sight to bring stillness to the body and mind. You can practice Trataka using any object—a star, a point on the wall, the ground in front of you. Trataka is traditionally practiced using an actual candle flame.
In this meditation, I'm going to take you through six practices to strengthen your eye muscles before we move into a three-part candle gazing meditation. If you enjoy this practice, please find more classes with me on myYogaTeacher.
Before we start, I want to remind you that candle meditation typically requires a lot of concentration and can not be performed anywhere like other forms of meditation can. Be sure you have a quiet space prepared where you will not be interrupted before beginning this practice.
Trataka meditation has been around for generations. It has survived over time due to several benefits. Specifically, Trataka meditation:
Alleviates stress and anxiety
Improves concentration and memory
Strengthens your eyes
Purifies and stimulates the sixth chakra, Ajna, that controls intuition and mental awareness
[inline-CTA-1]
First, we encourage you to remove your glasses while you're doing a candle meditation. It's also important that you maintain a distance of 1–1.5 meters between you and your candle, and that you don't blink during the candle gazing.
For this Trataka meditation, you'll need to know three different kinds of palming. Here's what cupping your hands looks like:

Rub your palms together to generate heat in your hands. Rest your palms in a cupped shape around your closed eyes.
Rub your palms together to generate heat in your hands. With your palms in a cupped position, place them around your closed eyes. As you inhale, apply light pressure around your eyes with your cupped palms. On the exhale, release the pressure (keeping your palms cupped around your eyes. Repeat this for five cycles of breath.
Rub your palms together to generate heat in your hands. With your palms in a cupped position, place them around your closed eyes. Apply constant pressure around your eyes with your cupped palms. Maintain the pressure for five cycles of breathing.
We're going to start our Trataka candlelight meditation with a few stretches to bring relaxation into the body.
Sit up tall in a chair or cross-legged position with your palms on your knees. Roll your shoulders back to open your chest and close your eyes.
Breathe normally, allowing a gentle smile to rest on your face. Maintain this smile throughout your practice... And throughout the rest of your life.
Observe your breath as it comes in and flows out, noticing the cool air that's coming into your nose and the warm air that's leaving your nose.
Inhale. On the exhale, lightly twist your torso to the right. Inhale back to the center and exhale to the opposite side. Inhale back to the center and relax for a moment.
Next, drop your head to the right side on the exhale. Inhale to return center and repeat on the other side. Continue to warm up your neck, tilting your head back and forward, inhaling each time as you return to center.
Join your palms together at heart center, namaste, and let's join together in chanting Om.

Rub your palms together to generate heat in your hands, cup your palms around your eyes, and blink your eyes open.
Press your palms into your knees and tilt your head back, eyes looking up, stretching the front of your neck. Exhale your chin to your chest, stretching the back of the neck. Repeat this five more times.
Bring your palms to your shoulders on either side of your neck with your fingertips pointing down your back. Pull down slightly on your shoulders as you exhale, tilting your head back, your eyes look up towards the ceiling. Hold this stretch for a count of five.
Next, bring the fingertips of each hand together and place your fingertips on your shoulders with your elbows touching in front of your body. Start rolling your shoulders, circling your elbows down, out, up, and touching them in front of your body 10 times. Reverse this movement for another 10 counts.
Sorry, your browser doesn't support embedded videos.
Now, swing your arms to the front and back of your body, allowing them to cross in front of your body on the exhale. Do this 10 times.
Stretch your legs out in front of you and shake them out a bit, moving them side to side. Then, start rapidly bending and straightening your knees. This is a good practice for both relaxation and knee pain.
Bring your arms out to the side of your body and inhale. On the exhale, bend to the right side, dropping your elbow to the ground and stretching along the left side of your body. Let your left arm reach up and over your body. If you're sitting in a chair, just bend over to the side as far as you can to feel the stretch.
Inhale, coming back to the center, and exhale to the other side.
Repeat this movement several times, keeping your hips square and planted on the ground or chair.
Sorry, your browser doesn't support embedded videos.
Interlace your fingers in front of you and stretch your arms up over your head, inhaling. On the exhale, allow your arms to float down to your side and then behind you, grabbing your right wrist with your left hand. Exhale and bend forward over your legs, keeping your arms behind you. Repeat this a few times, inhaling to come up and exhaling to fold forward.
Twist once more to the right and then the left.
Now we're going to move into six practices to strengthen the muscles around your eyes.
Sit up straight. For focus, you can bring your thumb out in front of you or, if you're comfortable without it, that's fine, too. Inhale, look to the tip of the thumb, and fix your gaze. Begin to move your thumb up and down, following the movement with your eyes without blinking and without moving your head. Remember to smile. Try to keep your eyes in each position for one second (up for one second and down for one second). Do this 10 times and finish with rest palming.
This time, you'll be following the movement of your thumb to the right and left, without blinking and without moving your head. Keep your eyes in each position for at least one second. Do this 10 times and finish with rest palming.
Follow the movement of your thumb on the diagonal—up to the right and down to the left. Once again, do this without blinking and without moving your head, keeping your eyes in each position for at least one second. Do this 10 times. This time, you'll finish with press and release palming.
Repeat the diagonal eye movements, this time going up to the left and down to the right. Do this without blinking and without moving your head for 10 repetitions, with your eyes in each position for at least one second. Finish with press and release palming.
Now, we're going to move our eyes in a clockwise rotation—right, up, left, and down. Don't blink and don't move your head. Be sure to keep your eyes in each position for at least one second. Complete this clockwise rotation 10 times before finishing with constant pressure palming.
Repeat the rotational movements, this time going left, up, right, and down. As always, don't blink and don't move your head, just your eyes. Keep your eyes in each position for at least one second and complete the anti-clockwise rotation 10 times. Finish with constant pressure palming.
Leave your eyes closed for a few seconds and relax before we move into the meditation. Now you are ready for our candle meditation.
[inline-CTA-2]

Start your Trataka meditation by turning down the lights and sitting between 1–1.5 meters from your candle. Sit in a pose that's comfortable for you and that you can hold for the duration of the meditation. Once you're comfortable, close your eyes.
With your eyes closed, observe the lightness around your eyes. Listen to your breath. Slowly, with your head angled down slightly, blink your eyes open, looking softly at the floor.
For the next minute, try not to blink.
Look at the base of the stand that your candle is sitting on. Slowly bring your gaze up the length of the candle stand to the base of the candle itself. Then, let your gaze move up the candle to the flame. Look at the flame for the next 30 seconds.
Close your eyes and do press and release palming. Release your palms back down to your knees.
Candle gazing takes practice. Be patient with yourself as you're learning this process.
Blink your eyes open, looking softly at the floor. For the next minute, don't blink.
Once again, look at the base of the candle stand and slowly move your gaze up the candle stand to the base of the candle. From there, let your gaze continue up the length of the candle to the flame. Look at the flame of the candle and deepen your focus. See the wick inside of the flame. Watch the wick burn inside of the candle flame for 30 seconds.
Close your eyes and do constant pressure palming. Release your palms back down to your knees.
Blink your eyes open, again looking softly at the floor. Don't blink for the next minute and a half.
Look towards the base of the candle stand, slowly bringing your gaze up to the base of the candle itself before continuing up the length of the candle to the flame. Focus on the flame of the candle for the next 30 seconds. Bring your awareness completely towards the flame, deepen your awareness and focus. Really look at the flame, observing its shape, color, and size. Notice the flame's aura and the particles around it.
Close your eyes and do constant pressure palming.
This time, instead of dropping your palms back to your knees, allow them to remain on your eyes as we move into Bhramari Pranayama, or humming bee breath. Take a deep breath in and hum, producing a sound like a buzzing bee, allowing your body to feel the vibration.
Place your hands behind your back, grabbing your right wrist with your left hand, and inhale, arching your back and looking up to the ceiling. On the exhale, fold forward. Return to an upright position with your palms on your knees.
Observe the silence within you and find the awareness toward your body. Observe the changes in your body, especially in the eye muscles.
Continue with your eyes closed. Move into savasana, laying down on your back with your palms facing up. Feel free to cover yourself with a blanket, if you'd like. If you're sitting in a chair, you're welcome to stay there and relax with your eyes closed.
Relax in savasana for several minutes.
When you're ready, interlace your fingers over your head and give yourself a full-body stretch. Keeping your eyes closed, bring your knees to your chest, roll to one side, and return to a sitting position.
Join your palms together at heart center, namaste. Take a deep breath in and finish by chanting Om, Shanti, Shanti, Shanti.
Finish with rest palming and blink your eyes open. Congratulations on completing your candle meditation!

Receive personalized guidance tailored to your unique fitness goals, live with a dedicated coach—no credit card required.

Discover the third eye chakra (Ajna) meaning, opening, and balancing practices with authentic Indian yoga teachers. Learn symbols, poses, mudras & affirmations.
%20(9).webp)
What are they and why are they important? This one's all about clearing, healing, and living your fullest life!
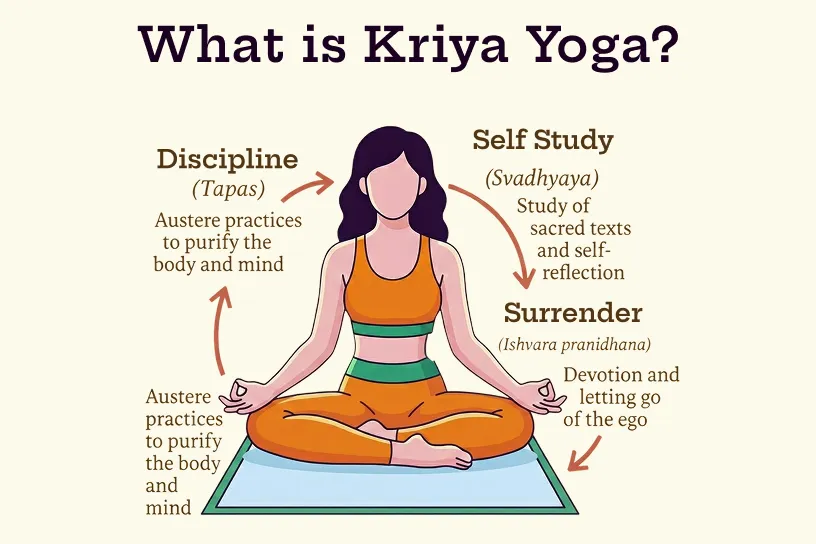
Learn authentic Kriya Yoga techniques step-by-step. Discover a complete guide to pranayama, meditation, and home practice from certified Indian teachers.


© Copyright 2025 MyYogaTeacher Inc