

Knee pain affects nearly 25% of adults worldwide, and its prevalence has increased by almost 65% over the last 20 years. Whether it’s due to arthritis, an old injury, or the natural wear and tear of aging, knee discomfort can drain your mobility, energy, and confidence.
“Knee pain is also common among runners and cyclists. After a certain period, pain can manifest if proper rest and recovery are not given, or if you’re wearing the wrong kind of shoes.”
While conventional treatments like physical therapy, medications, or injections may provide short-term relief, they often don’t address the root cause. However, yoga for knee pain offers a safe, low-impact way to stretch, strengthen, and stabilize the knees without aggravating the joint.
Continue reading to explore simple and effective yoga poses for knee pain, along with tailored modifications and expert-approved tips that promote long-term relief and recovery, right from the comfort of your home.
Research has proven the efficacy of yoga in reducing knee pain, improving joint function, and enhancing quality of life for people with chronic musculoskeletal conditions. A 2019 clinical review found that yoga significantly improves flexibility, strengthens supporting muscles, and may even help reduce inflammation, which plays a key role in knee-related issues like arthritis.
Yoga works on multiple levels:
And the best part? Yoga is accessible to everyone—whether you’re new to exercising or an active athlete seeking a way to manage knee pain. It is:
With proper guidance and modifications, yoga meets you where you are. Whether you’re dealing with age-related aches and pains or recovering from injury, it offers a holistic approach to stronger, more stable knees.
[inline-CTA-1]
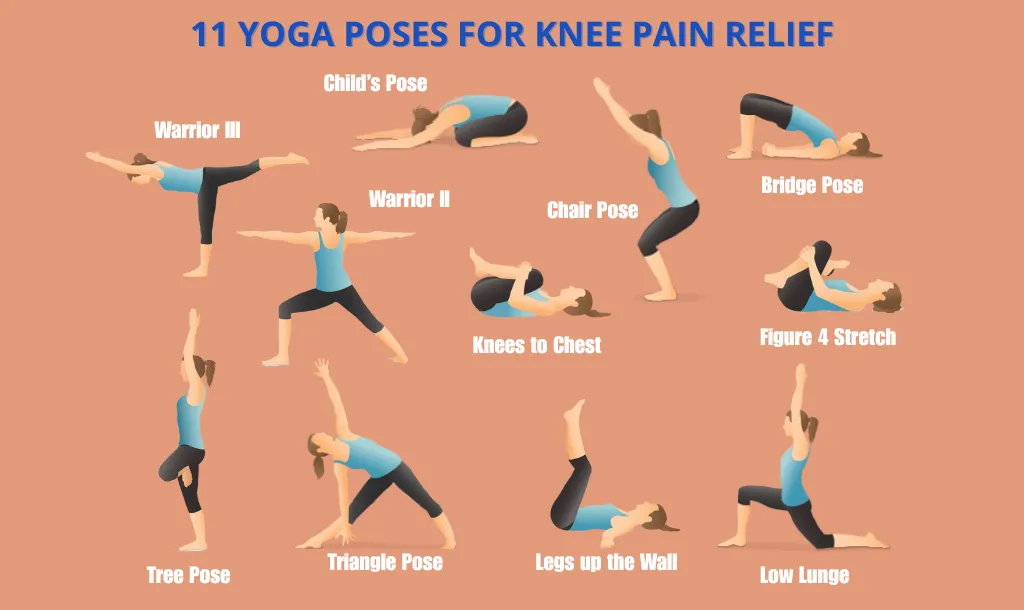
Here are some therapeutic yoga poses to safely support various causes of knee pain, from arthritis and injuries to overuse and age-related stiffness:
These poses are gentle on the joints and ideal for anyone experiencing pain due to arthritis, aging, or prolonged sitting.

This gentle pose is great for age-related mobility issues or wear and tear due to muscle overuse. It decompresses the knees and spine while calming the nervous system.
Modifications:

This lying-down position can help with injury recovery and lower back strain. It releases hip tension and gently mobilizes the knee joint.
Modifications:

This is a good stretch for overuse injuries like runner’s knee and IT band syndrome. It opens the hips and stretches the piriformis and IT band to release pressure from the knees.
Modifications:

This gentle and supported pose helps with swelling and arthritis–related inflammation. It helps reduce knee swelling, improves lymphatic flow, and calms the body.
Modifications:
These poses focus on building strength in the quads, hamstrings, glutes, and hips—the key muscles that support and protect your knees.

This pose helps deal with muscle imbalances and improves stability over time. It strengthens the quads, glutes, and calves to support the knees and surrounding muscles.
Modifications:

This is a great stabilizing exercise for joint misalignment and managing arthritis-related knee pain. It works by building strength in the hips and thighs and promoting awareness of knee and ankle alignment.
Modifications:
.jpg")
This pose targets weak hamstrings—a common cause of knee pain. It strengthens the glutes, hamstrings, and lower back while opening the hip flexors, which is important for balanced joint support.
Modifications:
.JPG")
The low lunge targets tight hip flexors and weak quads. It works by opening the front of the thigh and hips while activating the glutes and strengthening the back leg.
Modifications:
These poses build single-leg strength and balance, which are key elements for knee stability. They are ideal for anyone with some yoga experience or progressing from beginner sequences.
This is a great pose for building balance. It strengthens the ankles, calves, and thighs, improving overall balance and coordination to protect the knees.
Modifications:
.jpg")
This pose helps build strength in each leg. It trains you to balance on one leg and improves hip-knee-foot alignment.
Modifications:

This pose targets tightness in the outer hips and tension in the IT band. It stretches the hamstrings, glutes, and outer hips while improving spinal mobility and core control.
Modifications:
[inline-CTA-2]
Whether you have limited mobility or are managing arthritis, these short, focused routines are designed to meet specific needs.
Starting your day with yoga can help prevent knee pain by gently waking up stiff joints, boosting circulation, and energizing your body, making this an ideal routine for busy professionals.
Routine:
Doing these exercises can loosen up your hips and thighs, which often restrict the knees, especially after sleep.
This is a great alternative for seniors, anyone with limited mobility, or those who have recently undergone surgery.
Routine:
Chair yoga offers a safe and effective way to maintain joint function without kneeling or lying down.
Evening routines are ideal to provide rest to overused and tired muscles, especially beneficial for office workers, runners, and athletes. By releasing tension and reducing inflammation, it prepares you for restful sleep.
Routine:
This restorative sequence resets the lower body after prolonged sitting or standing.
This gentle routine is ideal for osteoarthritis and early-stage rheumatoid arthritis. It helps maintain joint mobility and reduce stiffness without inflammation flare-ups.
Routine:
This routine focuses on slow, controlled movement to maintain fluid flow in the joints and minimize impact on inflamed tissues.
.jpg")
Yoga is one of the safest ways to address knee pain—but only when practiced correctly and mindfully. Here’s how to avoid common pitfalls and make your practice safe and effective:
Immediately pause your practice and consult a doctor if you experience:
These signs may indicate the need for medical review before continuing.
Try these modifications:
Lifestyle Habits and Natural Remedies from Expert Yoga Coaches:
Knee pain doesn’t have to be a lifelong limitation. With the right approach and guidance, yoga can help you move better, feel stronger, and live pain-free. By practicing safe, expert-approved yoga poses, modifying when needed, and understanding your body’s needs, you can restore strength and stability in your knees.
Yes, yoga offers a low-impact way to relieve knee pain. It strengthens the muscles around the knee, improves alignment, reduces inflammation, and increases flexibility—all of which help reduce pressure and discomfort in the joint.
Some of the best yoga poses for knee pain include:
Each of these is low-impact, joint-friendly, and easy to modify based on your condition.
From all the yoga styles, here are some of the most gentle and low-impact ones:
It’s best to avoid intense styles like Ashtanga or Power Yoga until pain improves.
Start with 2–3 times per week, allowing your body time to recover. Even 10-minute daily routines can offer numerous benefits in reducing knee pain over time.
Avoid any pose that puts direct pressure on the knees (e.g., Hero Pose, full Lotus) unless properly modified. Use cushions, adjust angles, and opt for poses that strengthen and support the knee joint.

Receive personalized guidance tailored to your unique fitness goals, live with a dedicated coach—no credit card required.

What is the difference between allopathic and naturopathic medicine? Explore the answer to that here and why it matters to your health.


© Copyright 2025 MyYogaTeacher Inc