What is Lolasana (Pendant Pose)?
Lolasana, also known as "Pendant Pose," is an arm balance pose that requires strength in the arms, wrists, and core.
Pendant Pose can be challenging to execute at first, but it's attainable for yogis of all levels with practice and patience.
This pose resembles a pendant/pendulum suspended mid-air. A practitioner starts by lifting the legs off the mat, folding them close to the chest, and then hanging your whole body weight on your arms.
Whether you are looking to push your limits or simply explore a new pose, Lolasana is a rewarding and exciting addition to your yoga practice. So let’s see where it takes you.
Overview & Etymology
Lolasana emerges from a few Sanskrit words, 'Lola,' which means hanging or dangling, and 'Asana,' which means pose.
In modern yoga, Lolasana has become a popular pose due to B. K. S. Iyengar and Pattabhi Jois—who introduced this as an essential arm-balance pose in their yoga book and teaching style.
However, it is still unclear when this pose was first mentioned in any medieval hatha yoga texts.
Sanskrit Name: लोलासन Pronunciation: low-la-suh-nuh
Pose Type: Arm Balance Also known as: Pendant Pose or Swinging Pose
Strengthens: Spine, Wrist, Forearms, Shoulders, Upper Back, and Core
Stretches: Forearms and Wrist
Health Benefits of Lolasana
Activates upper back.
Improves concentration.
Opens the chest muscles.
Tones abdominal muscles.
Enhances balance and control.
Strengthens arms, wrists, and shoulders.
Stimulate the Manipura Chakra (Root Chakra).
Cultivates inner strength and resilience.
Increases self-confidence and willpower.
When to Avoid Performing Lolasana
Avoid if you have elbow arthritis.
Avoid if you got a wrist or arm injury.
Avoid if you feel tension in your neck.
Avoid if you recently had abdominal surgery.
Avoid if suffering from carpal tunnel syndrome.
Avoid temporarily during pregnancy or menstruation.
How to do Lolasana (Pendant Pose)
In this extensive guide, we will take you through everything you need to know about Lolasana—from the warm-up poses that will help you prepare for this challenging asana, step-by-step instructions for the main practice itself, essential safety cues, to the comforting relaxing asana.
So ready to get started!? Let's jump straight in.
Part 1 - Preparatory Poses for Lolasana
Before the main practice, activate your upper body, core, and spine with the following warm-up poses:
1. Phalakasana (Plank Pose) -
Plank Pose is an excellent preparatory pose for Lolasana as it helps to strengthen the arms, wrists, and core muscles. Start on all fours with your wrists just below your shoulders.
.jpg")
Grab onto your mat with wide fingers, gaze in the center of your palms, straighten your knees, and try to make your body resemble a wooden plank. Keep your body straight from your heels to the crown of your head. Engage your core muscles and hold the pose for 5 to 10 deep breaths.
2. Adho Mukha Svanasana (Downward-Facing Dog Pose) -
Downward-Facing Dog is another great preparatory pose for Lolasana as it stretches and strengthens the arms, shoulders, and core muscles for your main practice.

Begin on all fours, then lift your hips up, pointing towards the ceiling, and straighten your arms as well as your legs. Press your hands into the mat and lengthen your upper body by pushing your chest close to the ground. Hold the pose for 10 to 20 deep calming breaths.
3. Tolasana (Scale Pose) -
Scale Pose is a perfect warm-up pose for Lolasana as it helps to build strength in the arms, wrists, and core muscles. Sit on the floor with your legs straight out in front of you.

Place your hands on the floor behind your hips with your fingers pointing forward. Lift your hips off the ground and bring your feet off the floor, balancing on your hands. Hold the pose for a few deep breaths before releasing your grip and returning back to the floor.
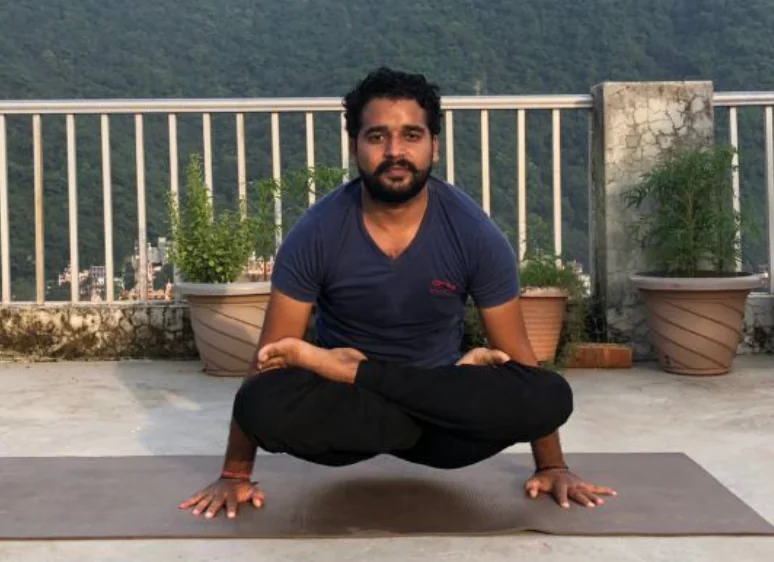
Part 2: Step-by-Step Instructions to Perform Lolasana
The following are steps to practice the pendant pose:
Step 1- Start by sitting on the mat with your legs stretched out in front of you in the staff pose.
Step 2- Bend your knees and get into the cross-legged Padmasana position.
Step 3- Next, engage your core, and place the palms beside your thighs.
Step 4- Keep your elbows bent, close to your hips on the side, inhale, and lift your glutes off the floor.
Step 5- Slowly shift your weight forward so your body is suspended in the air.
Step 6- Keep your gaze forward and maintain a straight spine in this position.
Step 7- Hold the pose for a few breaths here, keeping your core engaged and your arms strong.
Step 8- To release, exhale, slowly lower your feet to the floor, and sit back down in the lotus position.
Breath Awareness:
Inhale - Take a deep breath before lifting your feet off the ground.
Exhale - Exhale as you release your grip and sit back on the mat in the lotus pose.
Inhale & Exhale - Keep taking deep and steady breaths as you hold the pose.
Performance Duration for Beginners: Hold the pendant pose for 10-20 seconds.
Performance Duration for Advanced: Hold the pendant pose for 30-60 seconds.
Part 3: Things to Keep in Mind
For a safe practice of the pendant pose, make sure you are mindful of these posture cues:
Be mindful of your grip & placement of hands - Make sure your palms are flat on the ground, and your fingers are spread wide to create a strong foundation. Avoid gripping too tightly, as it can cause tension in your shoulders and elbow joints.
Maintain a lengthened spine - Keep your back straight and avoid rounding or arching your spine. This helps to engage your core muscles better and maintain a stable posture.
Keep the gaze focused: Looking forward will help you maintain your balance and avoid tilting forward or backward. Hence, avoid shifting your gaze extremely down or up.
Part 4: Relaxing Poses After Lolasana
1. Balasana (The Child’s Pose) - After the Lolasana pose, get into the tabletop position, sit back your glutes, and stretch your upper body with straight arms in front. Make sure you are continuously breathing mindfully.

Hold this pose for 10 to 30 seconds and release the tension in the lower back, hips, arms, shoulders, and spine. It also soothes the brain and promotes relaxation.
2. Savasana (Corpe Pose) - Still feeling the tension in your spine and arms, lie down on your back, arms by your side, and legs slightly apart. Close your eyes and breathe deeply, allowing your body to relax completely.

This Nidra (sleep) position helps relieve left-behind signs of stress and fatigue from your lower back, spine, and shoulders by calming the blood flow instantly.
Lolasana Variations to Consider
Once you have mastered the basic pendant pose, you may want to try some other variations to challenge yourself:
1. Bhramacharyasana (Celibate Pose): Once you have become a pro at your pendant pose practice, it’s now time to challenge your core with this variation.

In the celibate pose, you straighten your legs in the staff pose and lift your body off the ground with straight legs and stable glutes hovering over the mat. This pose requires an immense amount of stability in your core and strength in your shoulders.
2. Utthita Padmasana (Elevated Lotus Pose): Mastered both Lolasana and Bhramacharyasana, now it's time to test your core stability combined with leg flexibility.

In this variation, you start in a lotus position and slowly engage your entire core to push into the mat. Once ready, push into your shoulders and then arms, lifting your hips off the mat and balancing Padmasana in the air.
This yoga pose is more advanced and requires a significant amount of core stability and strength. Plus, it stretches the hips, thighs, and ankles, which can be really beneficial for people who spend a lot of time sitting or have tight hip flexors.

Enjoy a Free 1-on-1 Session with a Coach!
Receive personalized guidance tailored to your unique fitness goals, live with a dedicated coach—no credit card required.
Frequently Asked Questions about Lolasana
Beginners should avoid Lolasana as their very first arm balance because it demands loads of arm strength and mindfulness to be executed.
But newbies can always master this pose by gradually building strength and regularly performing a series of simple shoulder, wrist, and core strengthening exercises.
Lolasana is a fantastic upper-body workout that activates and strengthens your shoulders, wrists, core, and arms. Thus, it's a good workout choice for toned arms and shoulders.
Lolasana offers a range of physical and mental benefits, including arm, wrist, and shoulder strengthening, abdominal conditioning, chest opening, improved control and balance, and enhanced concentration.
To prepare for Lolasana, it's highly advisable to practice Forearm Plank Pose, Scale Pose, Crow Pose, and Full Boat Pose to strengthen the core, arms, and shoulders. All these preparatory poses will develop balance and awareness for the primary pose, making your practice smooth and safe.
Common variations of Lolasana include lolasana with yoga blocks, lolasana feet taps, and lolasana with feet-clasp—these add complexity to your practice, help you deepen your practice as well as boost your mind-muscle connection.
Anyone with wrist, shoulder, or back injuries should avoid practicing Lolasana unless they have recovered. Additionally, pregnant women, people with high blood pressure, and those who have recently had abdominal surgery should avoid these poses altogether.
Also, speak with your doctor and yoga instructor before you start any new physical exercise, especially if you have any pre-existing serious health concerns.
Related Articles on Padmasana

Yin vs Restorative Yoga: What’s the Difference?
Yin vs Restorative Yoga explained. Compare intensity, hold times, props, and benefits. Learn the key differences and choose the right slow yoga style for you.
.webp)
Detox Yoga Sequence: Refresh and Renew After Holiday Indulgence
Refresh and renew after holiday indulgence with this 12-pose detox yoga sequence. Gentle twists and mindful stretches for digestion, circulation, and energy.
%20(7).jpg)
Yoga for Gut Health: How This Ancient Practice Heals Your Gut-Brain Connection
Discover how yoga improves gut health through the gut-brain connection. Learn 8 poses to balance microbiomes, reduce inflammation, and heal your digestive system.