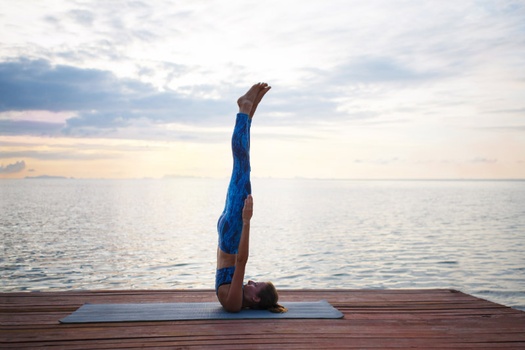
fcp
Sarvangasana (Shoulderstand Pose)

Sarvangasana (Shoulderstand Pose)

Navigation

What is Sarvangasana (Shoulderstand Pose)?

Sarvangasana (Shoulderstand Pose)

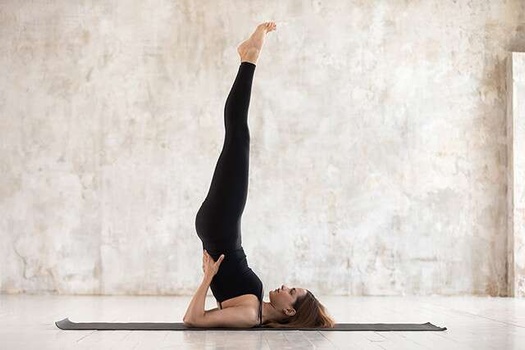
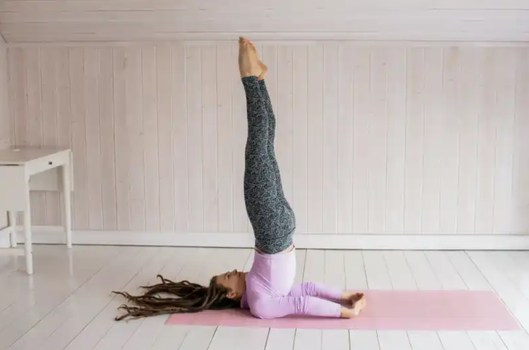
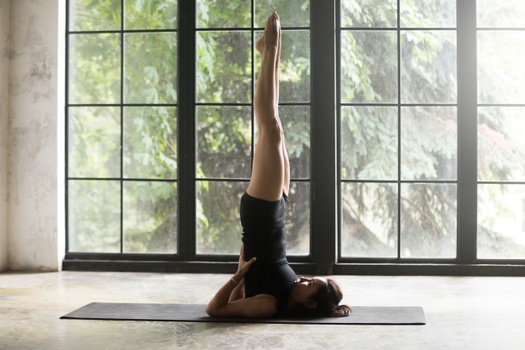
Sarvangasana, or Shoulderstand, is an intermediate-level inversion pose that belongs to the modern yoga exercise practice. This inversion pose stretches your neck and shoulders while strengthening your abdominal and leg muscles.

Performing this yoga asana offers unique therapeutic benefits for your thyroid gland and respiratory system. Also, as the name implies, Shoulderstand influences your body's overall muscle functioning and health.  

The name Sarvangasana originates from Sanskrit words Sarvang which means "all limbs," i.e. the total body, and Asana which means "Posture," "Position," or "Seat.”

The name Sarvangasana is modern, but there were existing similar yoga asanas like this one  -- known as Viparita Karani. 

Such versions of the Shoulderstand pose were noted in 14th-century Sanskrit text on yoga: Śiva Saṃhitā, 15th-century classic yoga manual: Haṭha Yoga Pradīpikā, and a 17th-century yoga Sanskrit text Gheraṇḍa Saṃhitā.

Yoga scholars have guessed that this modern name Salamba Sarvangasana is mentioned in Krishnmacharya’s book- Yoga Makaranda around 1934. 

Sanskrit Name: सर्वाङ्गासन                Pronunciation: sar-van-GAHS-anna

Pose Type: Inversion                       Also known as: Shoulderstand, Salamba Sarvangasana

Strengthens: Vertebral Column, Neck, and Shoulders     Stretches: Spine and Shoulders

Health Benefits of Sarvangasana 

  • Improves blood circulation in the whole body. 

  • Increases blood circulation inside the brain.

  • Strengthens the shoulders, core, back, and neck.

  • Improves the functioning of reproductive organs. 

  • Improves metabolism and helps in losing weight.

  • Increases blood flow in the eyes can improve vision.

  • Improves the flexibility of the spine and strengthens. 

  • Activates proper functioning of the thyroid and parathyroid glands. 

  • Relaxes the brain and helps in reducing symptoms of insomnia. 

When to Avoid Performing Sarvangasana

  • Avoid during menstruation. 

  • Avoid if you have high blood pressure. 

  • Avoid during the final trimester of pregnancy.

  • Avoid if you have a migraine or severe sinus headaches. 

  • Avoid if you’ve had a recent spine/neck/back/leg surgery. 

  • Avoid if you have spondylosis, a slipped disc, and/or an acute thyroid problem.

  • Avoid if you have any severe pain around your lower back/neck/shoulder/legs. 

How to do Sarvangasana (Shoulderstand Pose)

Anyone who wants to elevate the level of their yoga practice can start performing Sarvangasana. Although it’s not highly suggested for beginner yoga practitioners, you can still begin to build strength with shoulder stand posture modifications and variations. 

So, before you start, read and learn about the four different parts of Sarvangasana practice below: 

Part 1 - Preparatory Poses for Sarvangasana

Since Sarvangasana is one of the most challenging yoga poses in the Ashtanga yoga practice, it’s important to warm up your body first. 

Let's look at three ways you can prepare the essential muscle groups for your Shoulderstand practice. 


1. Setubandhasana (Bridge Pose) - Lie on your back and slowly lift your entire core up in the air. In this pose, you’ll support yourself with your hands, feet, and shoulders. 
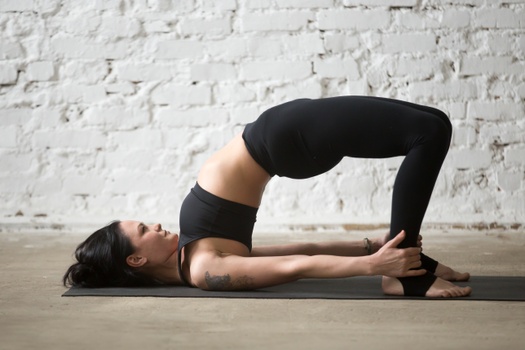
Setubandhasana (Bridge Pose)

This pose will work on your shoulder, neck, and leg muscles to help you flow better into the final Sarvangasana practice. 


2. Ardha Halasana (Half Plough Pose) - Lay down on the yoga mat with your back touching the ground. Now, lift both the legs up in the air. 
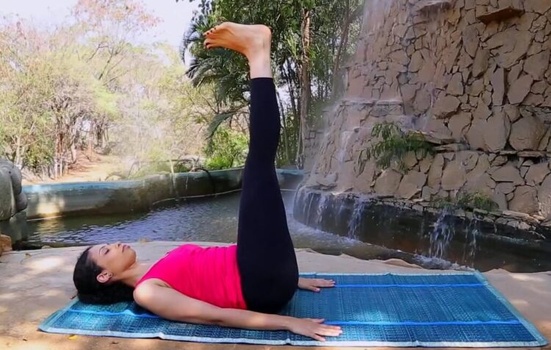
Ardha Halasana (Half Plough Pose)

Make an angle of 90 degrees with your legs, tuck your belly, and keep your entire core tight. 

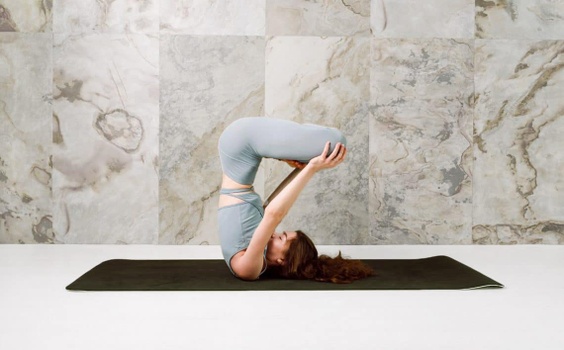
3. Halasana (Plough Pose) - 

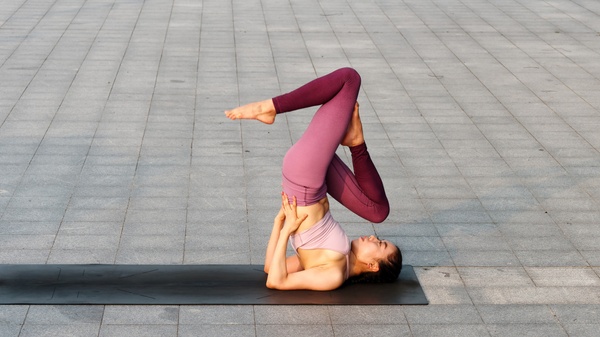
Continuing from Half Plough Pose, move to the full Plough Pose. Simply drop one leg to the back of your head and then drop your other leg into the same position and hold this pose here.  
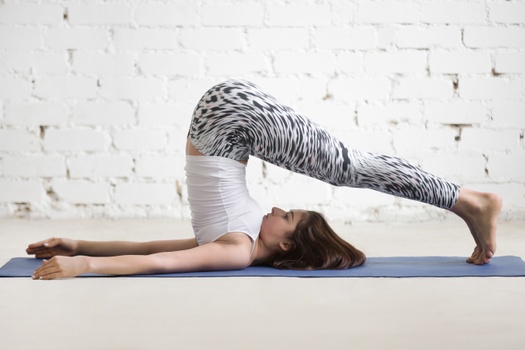
Halasana (Plough Pose)

Make sure your alignment is correct by checking that your knees are placed on top of your ears in a straight line. This pose will activate all the essential muscles that work more extensively in the Shoulderstand. 

Part 2: Step-by-Step Instructions to Perform Sarvangasana

Step 1- Lie on your back and bend your knees, with your feet flat on the mat and your arms relaxed at your sides.

Step 2- Keep both the arms flat on the ground and breathe normally at an average pace. 

Step 3- Slowly lift your legs and hips off the mat until your legs are perpendicular to the mat like in Half Plough Pose.  

Step 4- Now inhale, pressing down through your palms on the ground, and using your hands and triceps to lift and support your hips.

Step 5- Exhale completely and lift your lower back off the mat in a vertical straight line. 

Step 6- Pull your shoulder blades into your upper back, keeping your shoulder engaged. Keep your breath constant and smooth. 

Step 7- With your head flat on the mat, place your arms behind your back to support your core and legs as you hold yourself upright vertically. 

Step 8- Hold this pose upright in the air for a few minutes and then slowly bring your legs and back to the ground again by releasing your hands from the back. 

Breath Awareness:


Inhalation: Inhale deeply while lifting your back up. 

Exhalation: Exhale while releasing the pose and placing your back on the ground. 

Performance Duration for Beginners: Hold the Shoulderstand pose for 20-60 seconds. 

Performance Duration for Advanced: 

Hold the Shoulderstand pose for 1 to 3 minutes. 

Part 3: Things to Keep in Mind

If you are trying the Sarvangasana for the first time, here are a few essential posture cues to be mindful of: 

  • Don't rush into the pose: In the Shoulderstand pose, your shoulders, neck, and spine are very vulnerable. So it's crucial to keep your posture transition very steady and slow, rushing or jerking movement can displace the spine or neck, causing severe damage to the spine. 

  • Use safety props around you: If you struggle with balancing your body upright during Sarvangasana practice, you can modify the pose with fluffy cushions or bolsters around you on the ground. This will ensure that you land safely even if your balance is not perfect. 

Part 4: Relaxing Poses After Sarvangasana

Your body flexes at its maximum when you hold the Shoulderstand for longer durations. So it's important to perform resting counterposes to bring your neck and spine back to their original shape. Below are three different poses that will help you relax thoroughly. 


1. Savasana (Corpse Pose): After your Sarvangasana practice, lie down with your legs and arms spread in a five-point star posture. Release pressure from each muscle group by sinking your body into your yoga mat. 
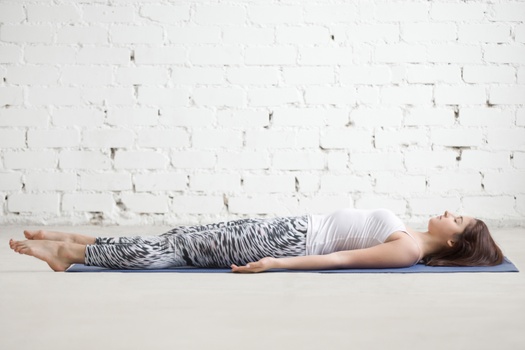
Savasana (Corpse Pose)

You can enhance your breathing pattern and close your eyes for a deeper release of tension. The corpse pose is a great resting counterpose because it helps your entire body relax after Shoulderstand practice. 

2. Paschimottanasana (Seated Forward Bend): 

After the Shavasana practice, raise your upper body and sit in a staff pose on your yoga mat. Keep your spine upright, engage your core, and start to slowly bend forward with a deep inhale. 
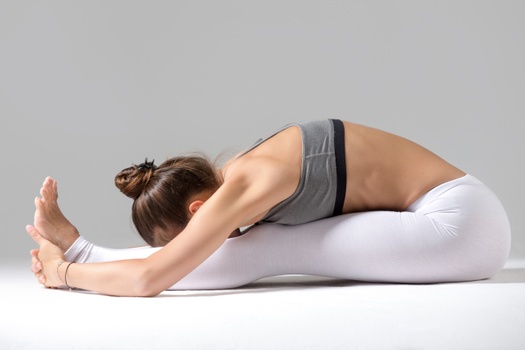
Paschimottanasana (Seated Forward Bend)

Once you touch your knees with your forehead, exhale and release any upper body tension by stretching your arms in front of both legs. 

3. Balasana (Child Pose): Continue moving from forward bend into a tabletop position on your yoga mat. Slowly sit back on your shins and stretch both arms out front. 
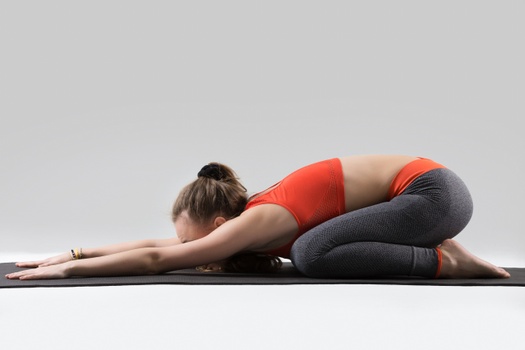
Balasana (Child Pose)

This pose will help you relax your spine, shoulder blades, lower back, and arms all at once after a long duration of Shoulderstand holds. 
Sarvangasana Modifications and Props

The following are a few modifications and yoga prop related cues for beginners: 

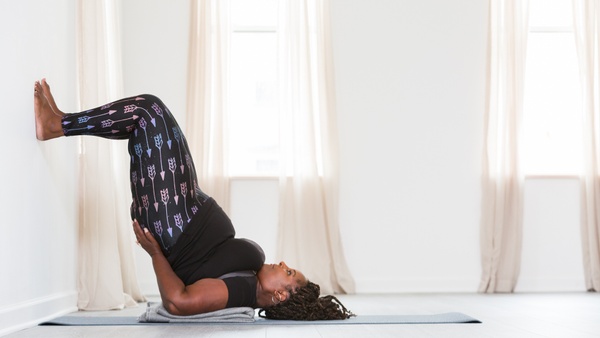
  • Practice with wall support. If you cannot balance your legs upright in the air, try practicing Sarvangasana against a wall. Bend both your legs from your knees and place them at a 90-degree angle against the wall. Practice holding this pose until you feel confident in moving away from the wall. 

Practice with wall support

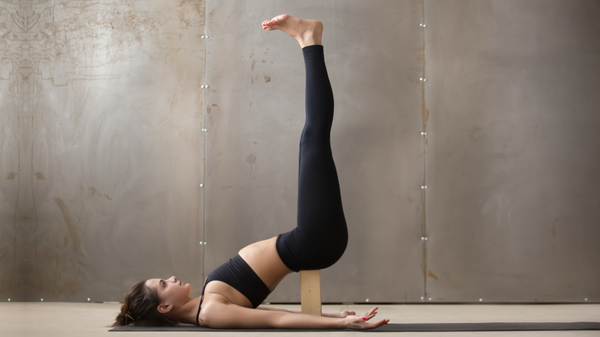
  • Add a yoga block. If your lower back is weak and you feel it’s hard to lift it up from the ground, add a yoga block or bolster pillow under your tailbone. This will increase strength and stability in your lower back. 

Add a yoga block

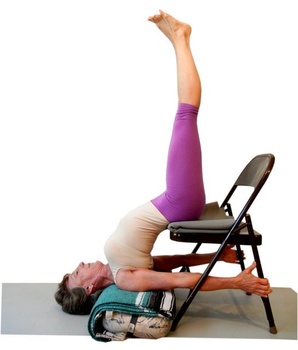
  • Sarvangasana with a chair and pillows. If you’re moving your Shoulderstand away from the wall but still feel challenged with balancing in the air, you can build a support system for yourself with a chair and pillows. The chair’s seat will act as a spotter for your lower back, and pillows will help you minimize the pressure around your upper back. 

Sarvangasana with a chair and pillows


Sarvangasana Variations to Consider

It doesn't matter if you are a beginner or an advanced yoga practitioner, variations are always fun in terms of experimenting with your body's capabilities. Below are some Sarvangasana variations that you can try: 

1. Shoulderstand Pose with Bent Legs: If holding your legs upright in the shoulder stand pose places too much pressure on the upper body, try bending your legs from the knees. 

Shoulderstand Pose with Bent Legs

This will reduce pressure around your chin, neck, and shoulders, making the lift more stable and balanced for a far longer duration. Once you feel strong enough, try lifting one leg at a time and straightening it to elevate your practice to the final goal. 


2. Single-Legged Shoulderstand Pose with Hands-on Back:

This is for intermediate yogis who want to hold the Sarvangasana upright for prolonged durations. 

Single-Legged Shoulderstand Pose with Hands-on Back


Start by lifting your back higher and then bend both your arms, placing them right in the middle of your back. This variation works as a support mechanism for your core and helps to keep the balance steady for longer. 

Learn Sarvangasana (Shoulderstand Pose) with Expert Indian Yoga Teachers – FREE!
Sign up for a free trial with MyYogaTeacher and get 14-days of unlimited live yoga classes online plus 2 complimentary private yoga sessions to help you get started!
Level-Up Poses After Sarvangasana for Advanced Yogis

The Shoulderstand pose is also known as the “Queen of all Yoga Asanas,” because it enhances bodily functions throughout the body. 

But if you’re trying to take your Sarvangasana practice to the next level, you can move onto the following list of advanced poses: 

Level-Up Pose 1: Urdhva Padmasana (Upward Lotus Pose) 

Level-Up Pose 2: Sarvangasana with Variation (Shoulderstand with Hands Behind the Back)

Level-Up Pose 3: Sarvangasana with Variation (Shoulderstand with Eagle Legs)

Level-Up Pose 4: Niralamba Sarvangasana (Unsupported Shoulder Stand Pose)

Urdhva Padmasana (Upward Lotus Pose)

Urdhva Padmasana (Upward Lotus Pose)

Sarvangasana with Variation (Shoulderstand with Hands Behind the Back)

Sarvangasana with Variation (Shoulderstand with Hands Behind the Back)

Sarvangasana with Variation (Shoulderstand with Eagle Legs)

Sarvangasana with Variation (Shoulderstand with Eagle Legs)

Niralamba Sarvangasana (Unsupported Shoulder Stand Pose)

Niralamba Sarvangasana (Unsupported Shoulder Stand Pose)

Similar Inversion Poses like Sarvangasana

Here’s a list of a few popular inverted yoga asanas, which are very similar to the Shoulderstand practice. Take a look below: 

  1. Halasana (Plough Pose)

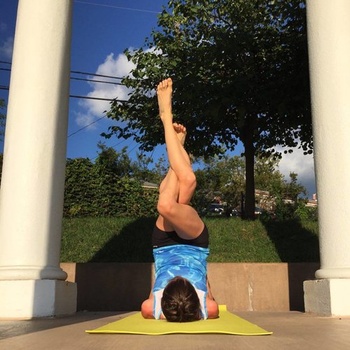
  2. Sirsasana (Headstand Pose)

  3. Pincha Mayurasana (Peacock Pose)

  4. Setu Bandha Sarvangasana (Shoulder Supported Bridge Pose)

  5. Adho Mukha Svanasana (Downward-Facing Dog Pose)

Frequently Asked Questions about Sarvangasana (Shoulderstand Pose)

What is Salamba Sarvangasana?

What is the benefit of Sarvangasana?

What are the steps of Setu Bandha Sarvangasana?

How long should Sarvangasana be done?

Who should not practice Sarvangasana?

What is the main pose of Sarvangasana?

Articles about Sarvangasana (Shoulderstand Pose)
article-cover-url
8 Easy Yoga Poses for Improved Blood Circulation

Do you often feel cold or numb fingers and toes, swelling, weakness, or a tingling sensation in your extremities? You might have poor blood circulatio...

Continue Reading
Ratings & Reviews
Moon
Moon
Thank you 🙏 Priyanka

Thu, Mar 14

Georgina
Georgina
Always so helpful and makes me feel okay and stabl...Read more

Wed, Mar 13

Sujatha
Sujatha
Excellent class

Wed, Mar 13

Ash
Ash
Lovely sequence, so so energizing. Thank you Annel...Read more

Wed, Mar 13

Kelly
Kelly
Great class today. I appreciate your detailed atte...Read more

Wed, Mar 13

Melissa
Melissa
The music in class today was a distraction for me.

Fri, Mar 15

Learn Sarvangasana (Shoulderstand Pose) with Expert Indian Yoga Teachers – FREE!
Sign up for a free trial with MyYogaTeacher and get 14-days of unlimited live yoga classes online plus 2 complimentary private yoga sessions to help you get started!

Looking to practice Sarvangasana ?

Drop your email in the field below, and we'll let you know as soon as we've added a Sarvangasana !